
Search our website enhanced by Google.
The milking machine is arguably the most important equipment on your dairy farm - it’s what harvests all the milk you sell. It’s also the only farm machinery to come into direct contact with your cows’ udders every day.
This makes it a high risk for spreading mastitis-causing bacteria from cow to cow. What’s more, if your milking machine isn’t working properly, it can damage blood vessels in the udder and cause hyperkeratosis at the teat end. This limits the cow’s natural defences against mastitis.
For these reasons, your milking machine must be regularly serviced and maintained. Parlours require a minor service every 750 operating hours and a more significant service every 1,500 operating hours.
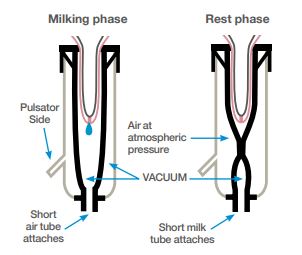
The milking machine uses a vacuum to extract milk from the teat. There are four teat cups (comprising shells and liners) attached to the claw piece. The alternating admission of air at atmospheric pressure and under vacuum into the pulsation chamber, between the shell and the liner, causes the liner to open and close.
When the vacuum level between the liner and the shell is greater than the vacuum under the teat, the liner opens and milk flows. When the pulsation chamber contains air at atmospheric pressure, the vacuum under the teat causes the liner to collapse, massaging the teat and mitigating the adverse effects of vacuum.
Hyperkeratosis is a thickening of the skin at the teat end. It’s caused by excessive growth of the keratin that lines the teat canal. There are many possible causes, including:
Hyperkeratosis increases the risk of new infections, so it’s important to find out what’s causing it and fix the machine. Other changes in teat condition at the end of milking, such as discolouration, fluid swelling, ringing or wedging, are also reliable signs that there could be a problem with the milking system.
Good cluster position, adequate tube support and well-controlled cows all help to ensure even milking. Uneven or incomplete milking are indicators of poor milking machine operation.
To make sure your milking machine is working efficiently and not damaging your cows’ teats, include these regular daily, weekly and monthly checks in your dairy management.
Check the vacuum level
Teats can be damaged when the vacuum isn’t at the correct level. This should be:
You should also be able to hear the vacuum regulator opening and closing when the cluster is attached.
Listen to the pulsators
Pulsation should be regular. Listen to the pulsators and get the machine tested if they’re out of sync.
Check air admission holes are clear
Air admission holes in the claw piece should be unblocked. Otherwise, milk will be removed more slowly from the claw, leading to large fluctuations in the vacuum. Liner slips can occur, and there will be milk in the liners when the cluster is being taken off. Unblock air admission holes using the proper tool.
Check teats as cups come off
Check cows’ teats as clusters are removed. If they’re discoloured (either red or blue, congested or ringed), there may be a problem such as high vacuum, poor pulsation, over-milking or incorrect liner selection. You should investigate this.
Check cow behaviour
Watch the cows when they’re milking. If they’re unsettled, this may indicate a problem with the milking machine.
Check for twisted liners
Ensure liner markings on the hood and short milk tube are aligned.
Check filters on pulsator airlines
Keep the filter on the pulsator airline clean and ensure the pulsation characteristics are satisfactory.
Listen to the regulator
When milking, make sure the regulator is admitting air; you should hear a hissing sound. The volume of air should reduce when clusters are attached.
Check liner condition
You should change liners every 2,500 milkings or every six months, whichever comes first. Silicone liners have a life expectancy closer to 8,000 cow milkings.
Note: Liners must be in good condition, as they’re the only part of the machine that come into direct contact with the cows’ teats. When they’re worn, they lose their shape and don’t massage the teat correctly, resulting in longer milking times and reduced yields. Worn liners are also a source of bacteria, particularly thermoduric bacteria (see our guide to thermoduric management), as they hide in the cracks in the liner.
Check drain valves on pulsator airlines
The drain valve on the airline should be opened when the milking machine has stopped working. Any milk or water coming from this airline after milking suggests a cracked liner or pulse tube.
Check vacuum pump oil level
The oil in the vacuum pump forms a seal between the rotor and the frame of the motor to stop the vacuum leaking air/vacuum.
Check effective reserve
You can check the effective reserve by closing the buttons on all the claw pieces and then opening just one. If the vacuum gauge drops by more than 2 kPa, the effective reserve is not adequate. This test is applicable for plants with 16 to 32 units.
If there are more than 32 units, open two units and check the vacuum gauge again.
Check milking times
The ‘milking time’ is the time it takes to milk one cow. It will depend on cow yields, but from milk let-down to finish, it will usually be 5 to 7 minutes.
Check liner slip
During one milking, record the number of liner slips or squawks that need to be corrected by the milker. Five or fewer per 100 cows is acceptable, while 10 or more per 100 cows requires investigation.
Routinely servicing and maintaining your milking machine keeps it working effectively and reliably. It also helps reduce the risk of faults developing and inconvenient breakdowns.
The correct vacuum levels, pulsation rate and ratios are essential to remove milk efficiently without damage to the teat or udder. You can check these by performing a static milking machine test.
This service should include:
The service will probably include service kits for pulsators, milk meters, and milk and vacuum pumps. You should also arrange a test if you notice any abnormalities. Looking at teat condition (teat ends and colour) and cow behaviour while you’re milking will give you a lot of information about how the milking machine is working.
A milking parlour will usually need an interim service after 750 operating hours and a more significant service after 1,500 hours. A 250-cow herd milking for seven hours a day will need a major service every 215 days.
A static and dynamic milking machine test should be carried out at least twice a year by an independent, suitably qualified technician to the latest standards relevant to the machine or installation date (currently ISO6690:2007).
Sectors:
